
 |
| |
With the gradual erosion of privacy and freedom in the world today, I would encourage ALL email users to start using secure encryption as soon as possible. This will ensure that no one can eavesdrop on your email conversations and prevent government agencies from reading your emails. By routinely encrypting every single message we can not only ensure our personal privacy, but also help to render inoperable government snooping projects such as Echelon.
Probably the easiest way of obtaining secure email on Micrsoft Windows is by installing Thunderbird, Gnu Privacy Guard (GPG) and a Thunderbird plugin called EnigMail. The whole process can be quite daunting for the first time user, so I've tried to make these instructions as straight-forward and simple as possible.
Firstly you should download and install a copy of Thunderbird. I have written some separate, detailed instructions for doing this.
Once you've followed the instructions and installed Thunderbird, click 'Back' on your browser to return to this page and continue....
You're now ready to install GnuPG, which is the more complicated part....
1. Download GnuPG from www.gnupg.org/download/. To do this, go to the site and scroll down to the Binaries section. Download the latest binary (as of writing this, version 1.4.9) which is available from the direct link of ftp://ftp.gnupg.org/gcrypt/binary/gnupg-w32cli-1.4.9.exe
To start the install process, double-click on the newly downloaded gnupg-w32cli-1.4.9 installer. When asked, select the language you require.
As part of the install process, ensure that all the components are selected at the Choose Components section. Click Next to continue with the install.
Again, select the language required and click Next. Click Next on the subsequent windows, until installation is complete.
Once you've installed the GnuPG binary you need to tell Windows where it's stored so that future programs can access it when they want to use it. To do this follow the steps below;
1. Open the Windows Control Panel.
2. Double-click on System.
3. Click on the Advanced tab at the top.
4. Click on the Environment Variables button near the bottom (fig.4)
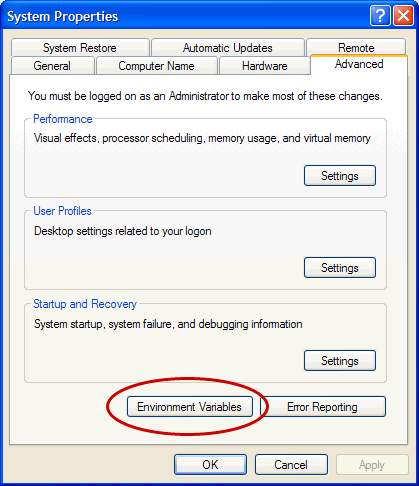
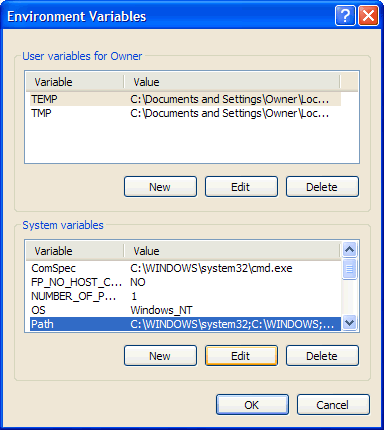
5. If the bottom section (System variables), scroll down until you find the Path variable (fig.5). Click on it and then click on Edit
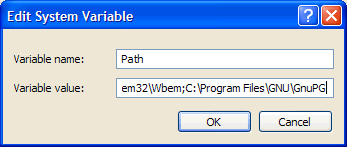
6. At the end of the existing setting type ;C:\Program Files\GNU\GnuPG (fig.6) and click OK.
7. Now click OK on the Environment Variables window.
8. Click OK on the System Properties window.
You should now be in a position to test everything out, so follow the instructions below....
1. Click on the Windows Start button (ie. the main start button on the bottom left of the task bar) and then click on Run....
2. Type cmd and press return. A command window will open, giving you a flashing prompt.
At this prompt type gpg --version and press return. You should get a display which looks like fig.7
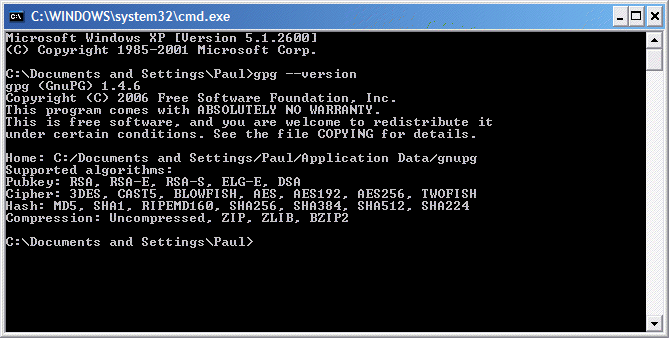
If all is well, you should now be able to use GnuPG. Firstly you need to create your key pair.
To create a new key, if this is the first time you've run GnuPG, then continue with these instructions. If however, you wish to import keys from another computer or a previous installation of GnuPG, skip to the importing keys section.
Before you do this, I would recommend thinking up a good pass phrase with which to secure your private key. You also require the email address you're going to include on your keyring.
To generate your key pair, enter gpg --gen-key into the command window which is still open.
The first time you do this, GnuPG will create your two (secret and public) keyrings and then ask you what kind of key you want. Select option (1) (the default choice anyway) to create both DSA and Elgamal keys.
Next you're asked for the length of your keypair. The larger this is, the more secure. 2048 should be large enough for most people, but I generally recommend people be slightly more paranoid :-) and opt for a 4096 bit key. Enter the keysize you require and press return.
Next you have to choose how long the key should be valid for. As you can't predict the future, I'd recommend setting an expiry date on your key, but this is entirely up to you. If you never want the key to expire, enter 0, otherwise enter one of the options given. I generally choose "2y" which will set an expiry date of two years. Once you've entered a value and pressed return, the expiry date will be calculated and shown, so that you can confirm your choice. Type y and press return.
You now have to enter your email account details;
First, your real name, such as "Paul Vigay". Enter it and press return.
Now enter your email address and press return.
Lastly, you can enter an optional comment, such as "Home account" or just press return to leave blank.
On pressing return, you will again be asked for confirmation and have the chance to edit any mistakes. If everything is ok, enter O (for Okay) and press return.
Now comes the important bit - that of entering your pass phrase. This needs to be relatively long and secure, yet you have to remember it in order to decrypt any messages people send you. I'd perhaps suggest entering a surreal phrase or sentence from a book, eg. "Eeyore likes eating green strawberries" or "the postman flies spotted six-legged unicorns" - you get the idea. This MUST be as secure as you can make it. If you can remember a whole sentence of random digits then that's good, but in the meantime it really should be the most secure pass phrase you can remember without EVER writing it down or giving anyone a clue as to what it may be. Strong security is only as strong as the weakest link in the chain....
You need to enter the passphrase twice to ensure that you've not made a mistake. Once you've entered it successfully, GnuPG will start generating your key pair. This will take a little time (perhaps 5-10 minutes or longer depending on the speed of your computer). Whilst it's doing this, you should carry on using your computer as using the keyboard, mouse and hard disc will allow the random number generator a better chance to gain enough entropy (don't worry if you don't understand this - basically, the more you use the computer whilst the key is being generated, the better the random numbers used during the process.
Once you've generated your key pair you can list the keys stored on your keyring (currently just the one - yours) by using the command gpg --list-keys
After creating your key pair, it's advisable to generate a key 'revocation certificate', just in case you ever need to revoke your key, especially if your public key becomes widely available. You don't need to do anything with this, other than to keep it very safe and secure on a floppy disc somewhere.
The command for this is gpg -a --output filename.asc --gen-revoke 0xKeyID where KeyID is your key ID as shown by gpg --list-keys
The key will be shown and you should enter y/n to confirm.
Then enter the reason for revoking - just enter 1 here.
You don't really need an optional description, so just press return and again confirm your choices.
Enter your passphrase in order to actually create the revocation certificate and then be VERY careful to hide the filename.asc certificate carefully. If anyone gets hold of this, they can render your key unusable, so I can't emphasise how much you should guard this file safely. Some people even place it in safety deposit box at their bank!
You are now ready to use GnuPG. You can close the command window by typing exit and pressing return.
In order to incorporate GnuPG into Thunderbird, you need to install a plugin called EnigMail
The current (as of May 2008) version of EnigMail is v0.95.6
1. Download the EnigMail module for Thunderbird (listed on the EnigMail page just under the Downloads for Windows heading). The direct link (assuming you're using Thunderbird 2) is addons.mozilla.org/en-US/thunderbird/downloads/file/22391/enigmail-0.95.6-tb+sm+xpi [1.12MB]
N.B. (if you're using Firefox you don't want it to attempt installing the .xpi file in Firefox itself, so you want to 'Save Link As...' in order to save the file on your hard disc.
2. Load Thunderbird.
3. Click on Tools->Add-ons
4. Click on 'Install' and navigate to wherever you saved the EnigMail extension in step 1.
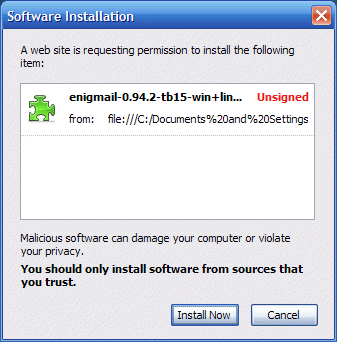
5. Click on the Install Now button. The extension should be loaded and you should see fig.9
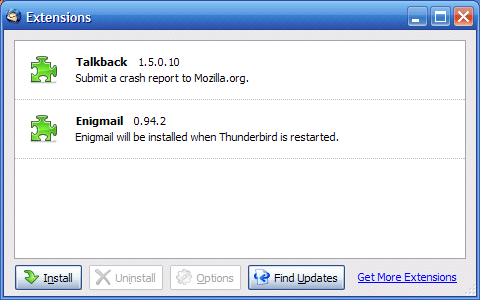
6. You should now close Thunderbird and re-open it for the new extension to become available. It will probably ask you to Restart Thunderbird anyway.
7. Assuming that you have an indentity setup in Thunderbird with the same identity as your newly created GnuPG key pair, you can configure Thunderbird to send/receive encrypted emails;
Go to Account Settings for your identity and click on OpenPGP Security.
Tick the Enable OpenPGP support (EnigMail) for this identity and the Use email address of this identity to identify OpenPGP key (fig.10)
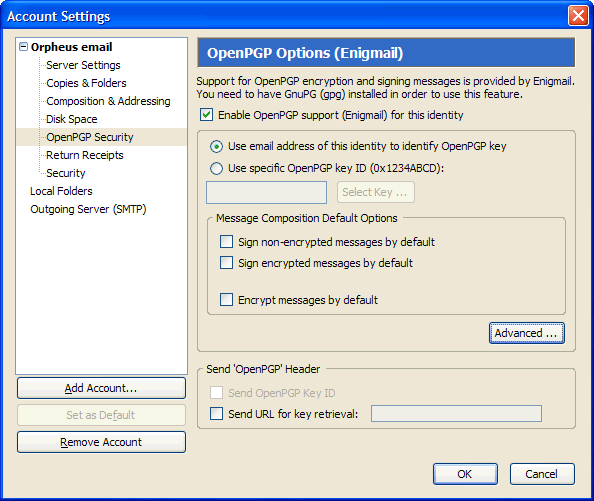
Click OK
Because sending messages in HTML format can confuse the encryption process (and is bad for emails anyway) you should turn off this facility;
Go to Composition & Addressing and turn off the Compose messages in HTML format option.
Click OK
8. You will see that when you compose messages now, you have an OpenPGP (padlock) icon available on the toolbar. (fig.11)
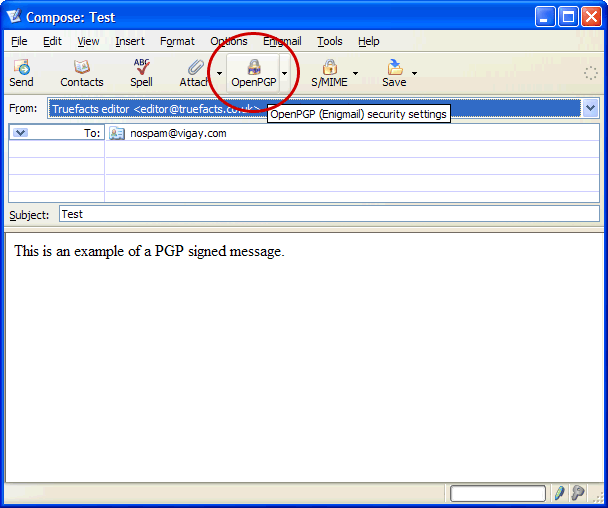
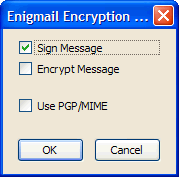
9. Click on the padlock and select the option you require (fig.12) (sign or encrypt message) and click OK.
10. Send your message.
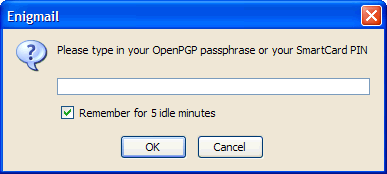
11. You will now be asked to enter your passphrase in order to digitally sign or encrypt the message (fig.13) . Enter the passphrase and click OK.
Your message should now be signed or encrypted (as determined at step 9) and sent to the recipient. When it arrives, they will see something which resembles the screenshot in fig.14
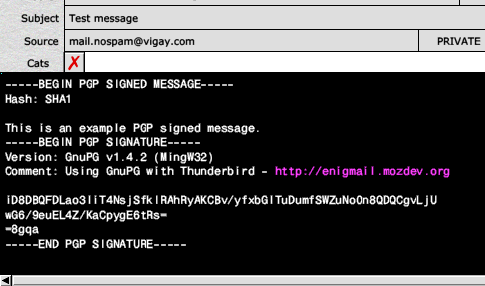
As long as they have also installed GnuPG correctly at their end (which they will have had to do in order to provide you with a public key with which to send them an encrypted message in the first place) they should now be able to decrypt your messages, or verify the signature.
Coming soon....
|
| |||||||||||||||||||||||||